- 经过了好一段时间的折腾,终于成功搭建好了博客。我就在这里分享一些使用Hexo+Github搭建的心得。既是为了分享,也是为了防止自己遗忘,备份之用。
搭建前准备工作
- 1.安装node.js
- 2.安装git
- 3.安装hexo (右键git bash 运行$ npm install -g hexo)
本地搭建静态博客
- 1.新建一个文件夹 如MyBlog
- 2.生成git模板 在MyBlog文件夹内,右键git bash输入$ hexo init
- 3.运行npm install
- 4.运行npm server
- 5.http://localhost:4000 可以看到本地搭建的博客
将博客关联github
- 在github上创建名字为XXX.github.io项目(XXX为用户名)
打开本地MyBlog文件夹内的_config.yml配置文件
,拉到最底下,更改为1
2
3
4deploy:
type: git
repository: https://github.com/OrangeTop/OrangeTop.github.io.git
branch: master第一次使用git需要配置ssh,引号处填写自己的邮箱
1
git bash $ ssh-keygen -t rsa -C "your_email@youremail.com"
然后一路回车即可成功生成.ssh文件
在C:\users\用户名.ssh文件夹中,打开id_rsa.pub,全部复制。然后回到github网站,
进入setting
选择SSH and GPG–>New SSh Key
title随意填,Key粘贴1
验证:git bash $ ssh -T git@github.com
上传本地仓库,
右键git bash。
(引号处注意填写自己的信息)1
2$ git config --global user.name "your name"
$ git config --global user.email "your_email@youremail.com"继续部署,中途需要输入用户名密码
1
2
3$ npm install hexo-deployer-git --save
$ hexo g
$ hexo d最后在浏览器输入OrangeTop.github.io 即可看见博客
The First Blog
- 进入MyBlog文件夹右键git bash
1
2
3
4
5
6
7
8
9
10
11
12//创建新的博客,文件在source->_posts文件夹下
hexo new "新的文件名"
//运行hexo,访问本地localhost:4000可预览
hexo s
//进入MyBlog文件夹下的public文件夹
cd public
//本地生成静态文件
hexo g
//返回MyBlog文件夹
cd ..
//将本地静态文件推送至github
hexo d
报错解决
下载hexo报错
1
2
3
4
5$ npm install -g hexo
npm ERR! Unexpected end of JSON input while parsing near '..."commander":"*"},"opt'
npm ERR! A complete log of this run can be found in:
npm ERR! C:\Users\75173\AppData\Roaming\npm-cache\_logs\2018-03-27T13_25_30_385Z-debug.log解决方法
1
2
3
4更换为淘宝镜像
npm --registry https://registry.npm.taobao.org install express
检验是否更换成功
npm config get registry若不成功,继续
1
2
3
4清理缓存
npm cache clean –force
重新安装
npm install -g hexo使用一段时间后,hexo d上传失败,ssh连接github失败
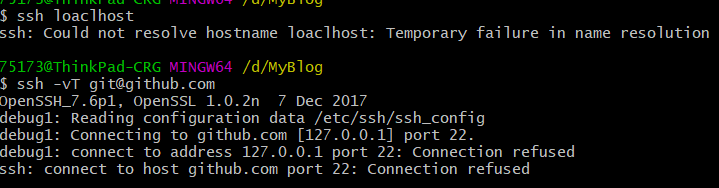
1
2
3
4打开C:\Windows\System32\drivers\etc目录下的hosts文件
再最后面加上下面两行
192.30.253.112 github.com
192.30.253.113 github.com